A Brief Look at the WebKit Workflow
Since I joined Igalia back in May, I have been working on WebKit. After more than a decade working on GCC and LLVM, moving codebases, workflows, and compilation techniques and optimizations meant I was in very unfamiliar territory.

One of the main things to understand is the contribution process and each project has their own rules and methodology, so lets start straight into how to contribute to WebKit. In a few places I will focus specifically on JSC -- for other parts of WebKit you might want to contact the mailing list or the irc channel for specific advice.
The information in this post should be used in addition to what is available in the official Getting Started and Contributing Code documents.
Cloning
WebKit uses svn as the default for version control but it has a git mirror, therefore given my preference for using git, we'll use that in the following examples.
To clone WebKit we type:
$ git clone git://git.webkit.org/WebKit.git
...
$ du -hs WebKit
9.7G    WebKit
This will take almost 10Gb of space at time of writing so if you are in a rush or short of space, use the --depth=1 option to git clone.
Building and Testing
The most important directory for workflow in WebKit is Tools/Scripts [1]. Here you will find all the scripts we will use in this post.
There are several scripts to build different parts of WebKit in different modes -- called Ports. For JSC you would use build-jsc script:
$ Tools/Scripts/build-jsc --jsc-only --debug
...
====================================================================
 JavaScriptCore is now built (02m:44s).
====================================================================
The --jsc-only flag specifies the WebKit port to build and you probably should use --debug while developing since it makes debugging much easier. Once you reach a point where you are happy with how it's going, run some tests. I should also mention that WebKit follows a very specific coding style and has a script to check for style problems. Don't worry too much about this in the beginning, until you have a patch. After a few contributions, you'll just get the hang of how to style your code. Make sure, either during development or before creating a patch that you check for style issues with Tools/Scripts/check-webkit-style:
$ Tools/Scripts/check-webkit-style
ERROR: Source/WTF/wtf/StackBounds.cpp:25:  Alphabetical sorting problem.  [build/include_order] [4]
ERROR: Source/WTF/wtf/StackBounds.cpp:126:  Place brace on its own line for function definitions.  [whitespace/braces] [4]
Total errors found: 2 in 2 files
The errors are self-explanatory and easy to fix. Go ahead and make the necessary changes.
Time to run some tests - There are several test scripts and you should probably run the tests most appropriate to the changes you have made. In general, you can list the testing scripts with:
$ ls -1 Tools/Scripts/run-*-tests
Tools/Scripts/run-api-tests
Tools/Scripts/run-bindings-tests
Tools/Scripts/run-builtins-generator-tests
Tools/Scripts/run-dashboard-tests
Tools/Scripts/run-gtk-tests
Tools/Scripts/run-iexploder-tests
Tools/Scripts/run-inspector-generator-tests
Tools/Scripts/run-javascriptcore-tests
Tools/Scripts/run-jsc-stress-tests
Tools/Scripts/run-mangleme-tests
Tools/Scripts/run-perf-tests
Tools/Scripts/run-regexp-tests
Tools/Scripts/run-webdriver-tests
Tools/Scripts/run-webkit-tests
Tools/Scripts/run-web-platform-tests
Tools/Scripts/run-wpe-tests
Scripts tend to have a very good --help menu so you should give those a try before you run them. For tests in JSC use: run-javascriptcore-tests.
$ Tools/Scripts/run-javascriptcore-tests --no-build --no-fail-fast --debug --jsc-only
...
    0 failures found.
If you run the tests and see some possibly unrelated failures be sure to run them again without your changes since they might be failures that made it into upstream and not necessarily a result of your changes.
Submitting a patch
Once you have the patch ready for upstream, you can submit it automatically with webkit-patch, which will automate much of the workflow process. Before proceeding though, make sure you have an account in the WebKit bug database.
The process can be summarised as follows:
- Create a patch upstream with
webkit-patch upload --no-review(the script will create a new bug to hold your patch)
- This will prompt you to fill at least one
ChangeLogin your favourite editor. If in doubt of the style, run agit logto see how other logs have been written and follow the same style - Remember not to change the line with the bug title and URL, these should remain unchanged from what
webkit-patchgenerated
- If you are confident about it, set the flag
review?to request a review of your code
- Wait for a review... if you end up waiting a week without reply feel free to ping someone on the mailing list or the irc channel about it
- If you get a
review-then, read the comments provided and fix the issues mentioned in the comments. Once the issues have been fixed, upload the new patch withwebkit-patch upload. Referring to the bug number in the command line is optional because the script can read the bug number from the already writtenChangeLog. But to be explicit about it, you can specify the bug number withwebkit-patch upload <BUG>, where<BUG>was the bug number created in step 1.
- After the review loop in point 2., you have a
review+. Until you have the correct permissions, you'll need someone tocommit-queue+your code. In order to request your code to be put into the commit queue, mark it ascommit-queue?. As soon as it is markedcommit-queue+, the bots will check your code, run the necessary tests, commit the patch upstream and close the bug.
That's it. You got your contribution upstream -- Congratulations!
Further notes on the review/commit-queue cycle
In order not to make the above three-point loop more complicated, I am using this section to drill down on the review and commit-queue flags. As first time contributors, all of our patches need to be reviewed and put into the commit-queue. These flags are known as review and commit-queue or by the shorthands r and cq. To these you can append the symbols -, ? or +. We can only set r? and cq? and wait for someone with more permissions to change these accordingly.
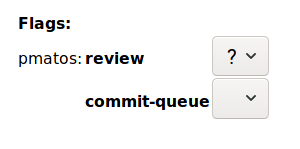
There are two ways to change these flags. In the web interface of your bug, you can click on the "Details" link for your patch and then change the flags accordingly.
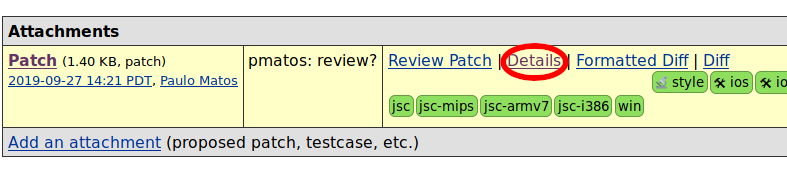
Once in the patch details view, you can see the patch flags.
When you submit a bug with webkit-patch upload, if confident, you can set the r? flag requesting a review by not using --no-review in the command. However, if you want to in addition request the patch to be sent to the commit queue after review, you can add to the upload command --request-commit. This will add the flags r? and cq?. If you don't use cq?, then you can manually set it once you get an r+.
The review process
There are a couple of situations that can happen during the review process (point 2. above) that are worth mentioning.
Wrong bug title
Imagine that you got your patch reviewed and you realised that the bug title, which you created when you first submitted your patch was based on incorrect knowledge and you wish to change it? Also, this needs to be reflected in the patch.
When you modify your patch locally and keep the ChangeLog unmodified, webkit-patch upload --no-review will automatically use the ChangeLog that you have locally. The best way to change the title of your bug is to do the following:
- Update the bug title in your bug page using the web interface, and;
- Execute
webkit-patch uploadwhenever you are ready to re-submit your fixed patch but add--update-changelog. This will automatically grab the new title and update theChangeLogfor you.
Apply patch locally
Imagine a collaborator improved your patch, uploaded it to the bug but it is still not quite right. You need for some reason to apply the patch locally to keep working on it. You can download it manually and apply it, however you can also automatically do this by checking the patch id (also known as attachment id) on the web interface and running on your WebKit checkout webkit-patch apply-attachment --force-clean <ATTACH>, where <ATTACH> is your patch id. Do note that --force-clean will remove all your local changes and commit.
There is a simpler alternative, where you don't need to look up the attachment id. If all you need is the latest patch uploaded to a bug, you can use webkit-patch apply-from-bug <BUG>. As with apply-attachment, the command apply-from-bug also accepts --force-clean
Command summary
Help
Global Help
webkit-patch help --all-commands
Command Help
Take upload as an example:
webkit-patch help upload
Upload patch
webkit-patch upload
This will upload your current local changes as a patch upstream. It will show you the patch it is going to upload before it actually does so it's safe to do to so what's included in the patch before the actual upload takes place.
Relevant flags:
--no-review: by default, theuploadcommand will set that patch toreview?(commonly shortedned tor?). Use--no-reviewif you think the patch is not ready to review, or if you want to confirm the patch is not breaking any tests by using the upstream build workers.--request-review: this will set thecq?flag on your patch so that it is added to the commit queue after review.--update-changelog: by default if aChangeLogalready exists it will use that, otherwise it will ask you to write one by opening your favourite editor. Sometimes, however you might have written aChangeLogbut you want to modify it. Use--update-changelogto request that.--comment=<COMMENT>: you can specify a comment to add to the post along with the patch upload. If you are uploading a new patch with changes requested by the reviewer, you should post a comment with--comment="Here is a new patch that addresses the commands in the review".
Apply upstream attachment
webkit-patch apply-attachment or webkit-patch apply-from-bug
This will apply an upstream patch locally. The command apply-attachment requires the patch (attachment) identifier so you might have to look that up beforehand. If you only need the latest patch to a bug, you can use apply-from-bug with the bug identifier.
Relevant flags:
--force-clean: if you have changes locally the patch might not apply cleanly. Use this flag to clean everything locally before attempting to apply patch. You might want to usegit stashto stash your changes, if they are important.
Bonus -- WebKit on GitHub
I prefer to use GitHub to keep my project forks however, the WebKit repository is so large that you won't be able to import it straight into GitHub (either through the UI or manually). If you try, you'll get an error about packs being too large.
The easiest way to get WebKit into GitHub is by forking the unofficial mirror here.
Thanks
Thanks to my Igalian colleagues Caio Lima and Guillaume Emont for reading a draft of this post and providing valuable suggestions.
Corrections or Comments?
Feel free to send any corrections or comments straight into my inbox.
Edits since publication (02.10.2019):
- 02.10.2019: my colleague Guillaume Emont found a typo in the "Upload patch" subsection, where I wrote
r+instead ofr?;
These scripts require Python2, therefore if you are using Python3 by default, you'll run into troubles running them. Try creating a virtual environment with
$ python2 -m virtualenv venv && source venv/bin/activateat the root directory of WebKit. ↩︎